Resource Consumption Tracking
- How it works
- Consumption data file format
- Get the consumption data files using the CloudAPI
- Process the consumption data files
- Access the consumption data files on the master mode
How it works
Every hour a consumption data file per account is generated on the master node.
This involves following three Jumpscripts:
aggregate_account_data.py: aggregates data from all locations that it gets by executingcollect_account_data.pyon the controller of each location, and stores the result on the mastercollect_account_data.py: per location this script runs on the controller to get the actual data for each accountresmonitoring.py: this scripts runs on the controller and stores the data on the controller, this data is afterwards collected by thecollect_account_data.pyscript
Consumption data file format
Every hour a Cap’n Proto (capnp) file per OpenvCloud account with following schema will be generated on the OpenvCloud master node:
@0x934efea7f327fff0;
struct CloudSpace {
  cloudSpaceId @0 :Int32;
  accountId @1 :Int32;
  machines @2 :List(VMachine);
  state @3 :Text;
  struct VMachine {
    id @0 :Int32;
    type @1 :Text;
    vcpus @2 :Int8;
    cpuMinutes @3 :Float32;
    mem @4 :Float32;
    networks @5 :List(Nic);
    disks @6 :List(Disk);
    imageName @7 :Text;
    status @8 :Text;
    struct Nic {
      id @0 :Int32;
      type @1 :Text;
      tx @2 :Float32;
      rx @3 :Float32;
    }
    struct Disk {
        id @0 :Int32;
        size @1 :Float32;
        iopsRead  @2 :Float32;
        iopsWrite  @3 :Float32;
        iopsReadMax @4 :Float32;
        iopsWriteMax @5 :Float32;
    }
  }
}

struct Account {
  accountId @0  :UInt32;
  cloudspaces @1 :List(CloudSpace);
}
Get the consumption files using the CloudAPI
Through the OpenvCloud CloudAPI you can download the consumption files for a given account as a zip file.
Here is how to do it using cURL:
APP_ID="..."
SECRET="..."

IYO_URL="https://itsyou.online/v1/oauth/access_token"
JWT=`curl -d "grant_type=client_credentials&client_id=${APP_ID}&client_secret=${SECRET}&response_type=id_token" ${IYO_URL}`

BASE_URL="https://be-gen-1.demo.greenitglobe.com"
ACCOUNT_ID=<...>

# Specify the start and end time in epoch format, see https://www.epochconverter.com/ for a converter
START=1211507665
END=$(date +%s)

curl -X GET -L --header 'Accept: application/octet-stream'  -H "Authorization: bearer $JWT" ${BASE_URL}'/restmachine/cloudapi/accounts/getConsumption?accountId='${ACCOUNT_ID}'&start='${START}'&end='${END} -o "${ACCOUNT_ID}_${START}.zip"
Process the consumption data files
In case the unzip command isn't yet available on your system, first install it:
sudo apt-get install unzip
Unzip the consumption file:
export DESTINATION_FOLDER="/tmp/data"
mkdir ${DESTINATION_FOLDER}
unzip ${ACCOUNT_ID}_${START}.zip -d ${DESTINATION_FOLDER}
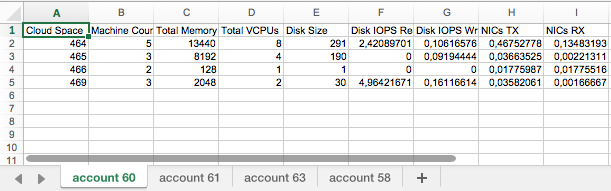
As an example you can check the export_accounts_xls.py demo script that processes all capnp files it finds in account/year/month/day/hour and converts it into an Excel document.
First make sure you have the python-xlwt package installed:
pip install xlwtGet the
export_accounts_xls.pyscript - requires access to the 0-complexity/openvcloud repository:curl https://raw.githubusercontent.com/0-complexity/openvcloud/master/docs/Monitoring/ResourceTracking/export_accounts_xls.py?$RANDOM > ${DESTINATION_FOLDER}/export_accounts_xls.pyGet the
resourcemonitoring.capnpschema - requires access to the 0-complexity/openvcloud repository:curl https://raw.githubusercontent.com/0-complexity/openvcloud/master/libs/CloudscalerLibcloud/CloudscalerLibcloud/schemas/resourcemonitoring.capnp?$RANDOM > ${DESTINATION_FOLDER}/resourcemonitoring.capnpThen execute the script:
cd ${DESTINATION_FOLDER}
ipython export_accounts_xls.py
This will generate an Excel document containing a tab for each account with the resource tracking details per cloud space:
Access the consumption data files on the master mode
In order to get access to ovc_master you first need to get access to one of the controllers of your G8 environment:
Check whether your private SSH key is loaded:
ssh-add -lIn case your private key is not loaded, let's add it by first making sure ssh-agent is running, and then actually adding the key:
eval $(ssh-agent)
ssh-add ~/.ssh/id_rsa
Clone the environment repository:
git clone %address-of-the-master-copy-of-your-environment-repository%Get the (public) IP address of one of the controllers from service.hrd in services/openvcloudovc_setupmain:
cat services/services/openvcloud__ovc_setup__main/service.hrdThe IP address will be found as a value for instance.ovc.cloudip
Make sure master_root, the file holding the private key for accessing the controller is protected:
chmod 600 keys/git_rootGet to the controller over SSH:
ssh root@%ovc-git-address% -A -i keys/git_root
Now that you are connected to one of the controllers, you will access the ovc_master Docker container:
On the controller you might first want to list all running Docker containers:
docker psThe ovc_master Docker container will be listed as one of the running containers, start an interactive session with it:
docker exec -i -t ovcmaster /bin/bashGet to the resource tracking records:
cd /opt/jumpscale7/var/resourcetracking
For each account there will be a subdirectory, for instance for the account with ID 60 this is /opt/jumpscale7/var/resourcetracking/6
In there you'll find further subdirectories structured as year/month/day/hour.